
This is Week 7 of the Grandmother's Choice Block of the Week quilt along. The block is Alice's Flag.
One of the options for the 5-point star is to use a pieced pattern and make all of the points from different fabrics.

I chose to make the pieced star since I am doing a modern, happy interpretation of the quilt. I took photos to share the method I used to piece and applique the star.
I love to do hand applique and hand embroidery. However for some reason, I do not like to hand piece blocks. They look messy to me. So, I look for machine pieced shortcuts to avoid as much hand-piecing as possible. Here's how I worked this star.
If you click on this link, you will get the .pdf file that has the layout and template for the pieced 5-point star. (the basic cutting and piecing instructions are on the blog.
To accurately mark the dots, poke a hole in the template on all for points. Then hold the marker over the whole for a few seconds until the ink leaks through the pinhole and accurately marks the spot with a dot.
Note: when you baste the edges, they will tend to curl under. Gently pull on the thread, NOT the fabric, to straighten the edges. Take care not so stretch those edges that are cut on the bias.
*BE SURE TO SEW ALL THE PIECES IN THE ORDER THEY ARE LAID OUT. It would behoove you to check placement twice before stitching!
NOTE: when you pin your edges, only sew ONE side of the pair (or you will feel silly and end up picking out one side, like I did. *sniggers and blushes*


 |
| Alice's Flag is a pieced background with an appliqued star on top of it. |
I chose to make the pieced star since I am doing a modern, happy interpretation of the quilt. I took photos to share the method I used to piece and applique the star.
I love to do hand applique and hand embroidery. However for some reason, I do not like to hand piece blocks. They look messy to me. So, I look for machine pieced shortcuts to avoid as much hand-piecing as possible. Here's how I worked this star.
 |
| This is what the .pdf file looks like. Note the template in the top right corner. |
If you click on this link, you will get the .pdf file that has the layout and template for the pieced 5-point star. (the basic cutting and piecing instructions are on the blog.
 |
| 1. Cut one point from each of the five different fabrics you have selected. I marked the beginning and end of the seam lines with a dot of temporary marking pens. |
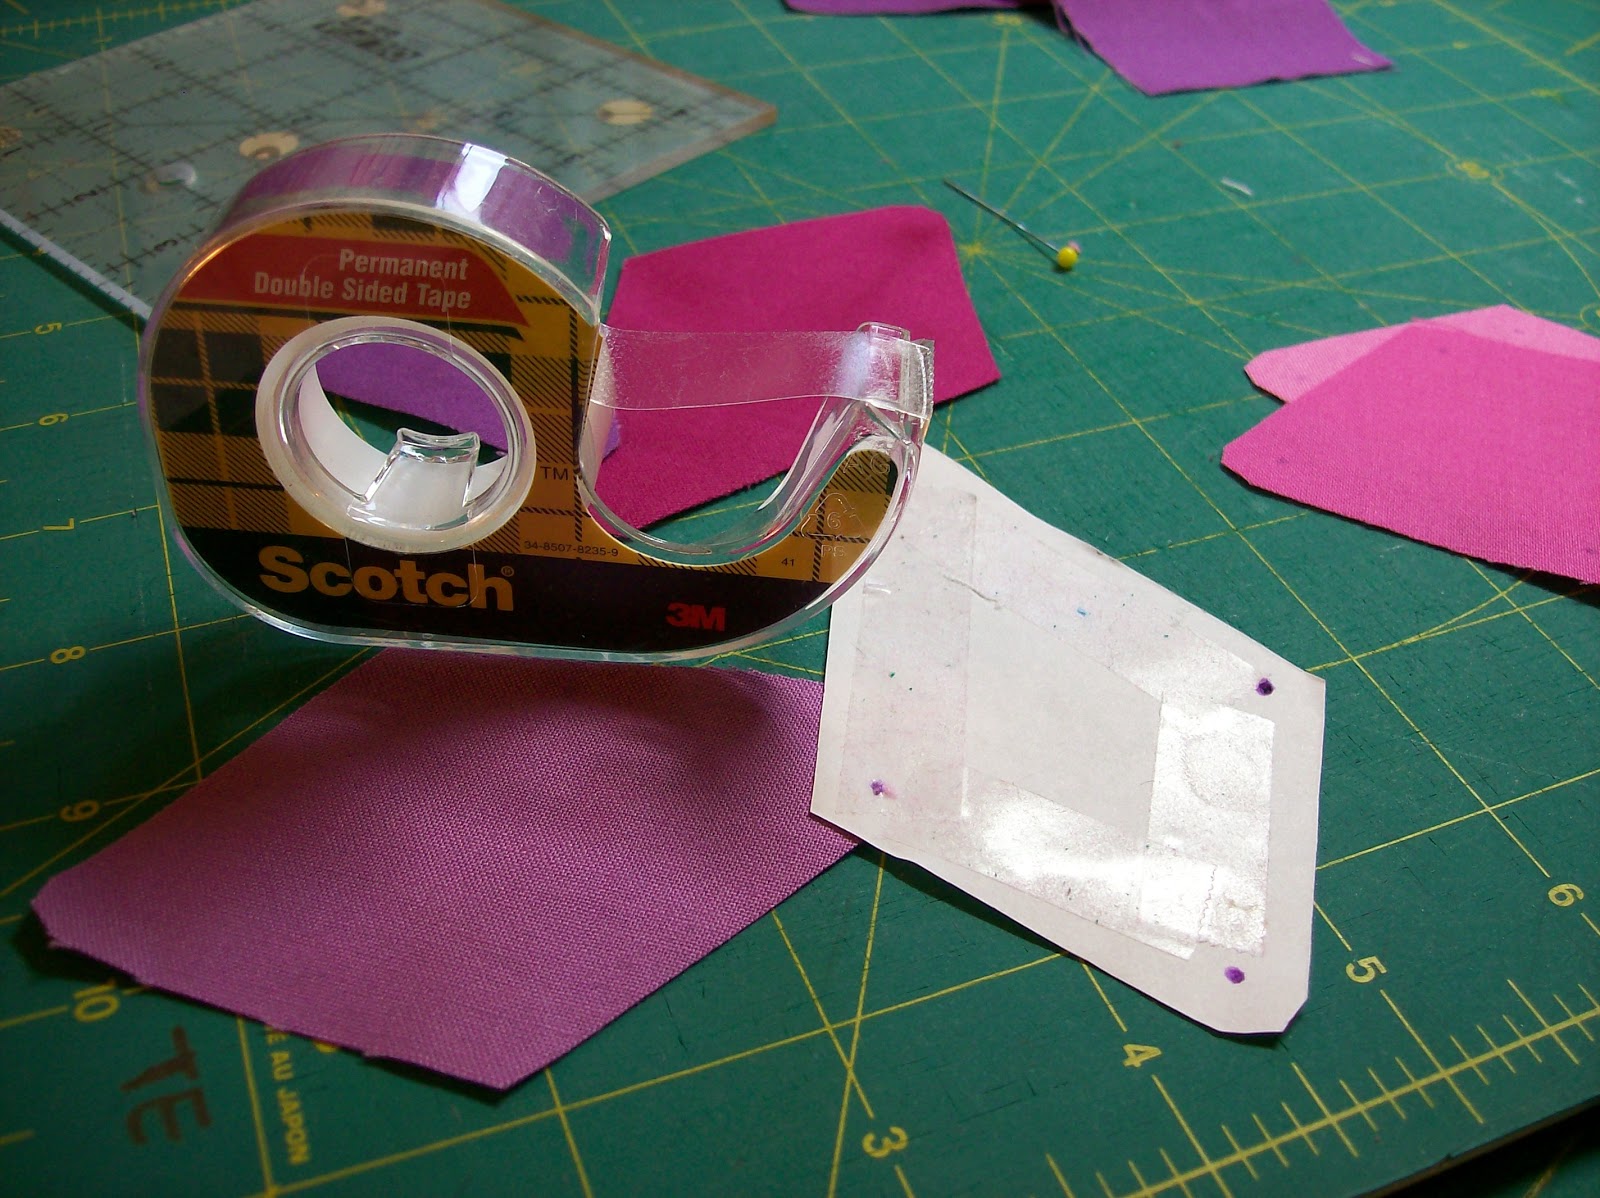 |
| BTW, I used two-sided tape to place the templates on the fabric, then cut each one with a rotary cutter and ruler. Take care to remove it gently so your bias cuts don't ravel. |
 |
| 2. Using extremely large stitches, baste around the points that will NOT be sewn together. This will give you a line to turn under when you applique. You can pick out the stitches as you applique it down. |
 |
| 3. Prepare to sew the points together. Line up the dots using a straight pen to insure accurate seams Sew two of the points that are side by side together (you will have two pair) |
 |
| 4. Join the last single point to the pair that is beside of it. To avoid accidentally stitching it, pin the previous seam open and away. |
 |
| 5. Sew the pair of points that are already joined to the other three points to complete the center of the star. |
 |
| This is what the front will look like at this point |
 |
| 6. Turn the block back over the back to press the seams. Press each seam in the same direction. |
 |
| 7. Because there is a 1/4" opening at the end of each seams, you can use your finger to manipulate the center intersection of seams until they twirl, this is also clockwise. Then you can press them flat. |

8. Press the points in just past the basting seam.
Then press one side of each point.
Do not press the other side so you can turn it while sewing.
This will help make your points as pointy as possible.

9. Position your star on the background fabric.
You can baste it down or you can carefully pin each section.
Take care that each piece is lying flat
so you don't have lumps in your finished applique.

10. Continue to blind stitch all the way around the star.
Voila! You are finished!
If you find a step that you can't understand the wording or does not work for you, please leave me a comment and we'll try to work it out together. :)
I must make one today! Thanks for the fun tutorial. I think I'll try it just as you say here.
ReplyDeleteYAY! Hope it works well for you! :D
DeleteA great tutorial, thank you for sharing
ReplyDeleteKarin på Ösäter
http://karinpaosater.blogg.se/
Thank you! That's always encouraging to hear!
DeleteNicely done, Teri! A good tutorial for those of us that avoid hand work as often as possible!
ReplyDeleteYES! For sure, LOL! Thanks for commenting and the encouraging words
Delete