Showing posts with label Tutorial. Show all posts

Wednesday, April 10, 2013

Quick Binding Trick

By the time I finish a quilt, it's just me sitting around while watching TV with hubby.  Nobody is around to discuss my method.  Has that happened to you?

We've talked about how wide to cut a binding strip (2 1/4"-2 1/2") but I don't remember talking much with other quilters about how to cut and piece a binding.

I am Suzy Shortcut... I don't like pinning (though I have learned when I can't skip it.)  I don't scissor-cut if I can figure out how to cut something with a rotary cutter (I use old blades for paper.)

And I would much rather eyeball something than measure (I forget numbers as soon as they are out of my mouth.)

That said, I like tidy bindings.  I always double fold, but to avoid bulk, I sew the various strips together with a bias cut on both end of each strip.

With this method, it's easy to end up with your diagonal seams going in both directions.  That's one of those kinds of details if I leave undone, it bothers me.  So, I want a method that gets them right all of the time.  I think this one is simple.
At the end of your binding strip,
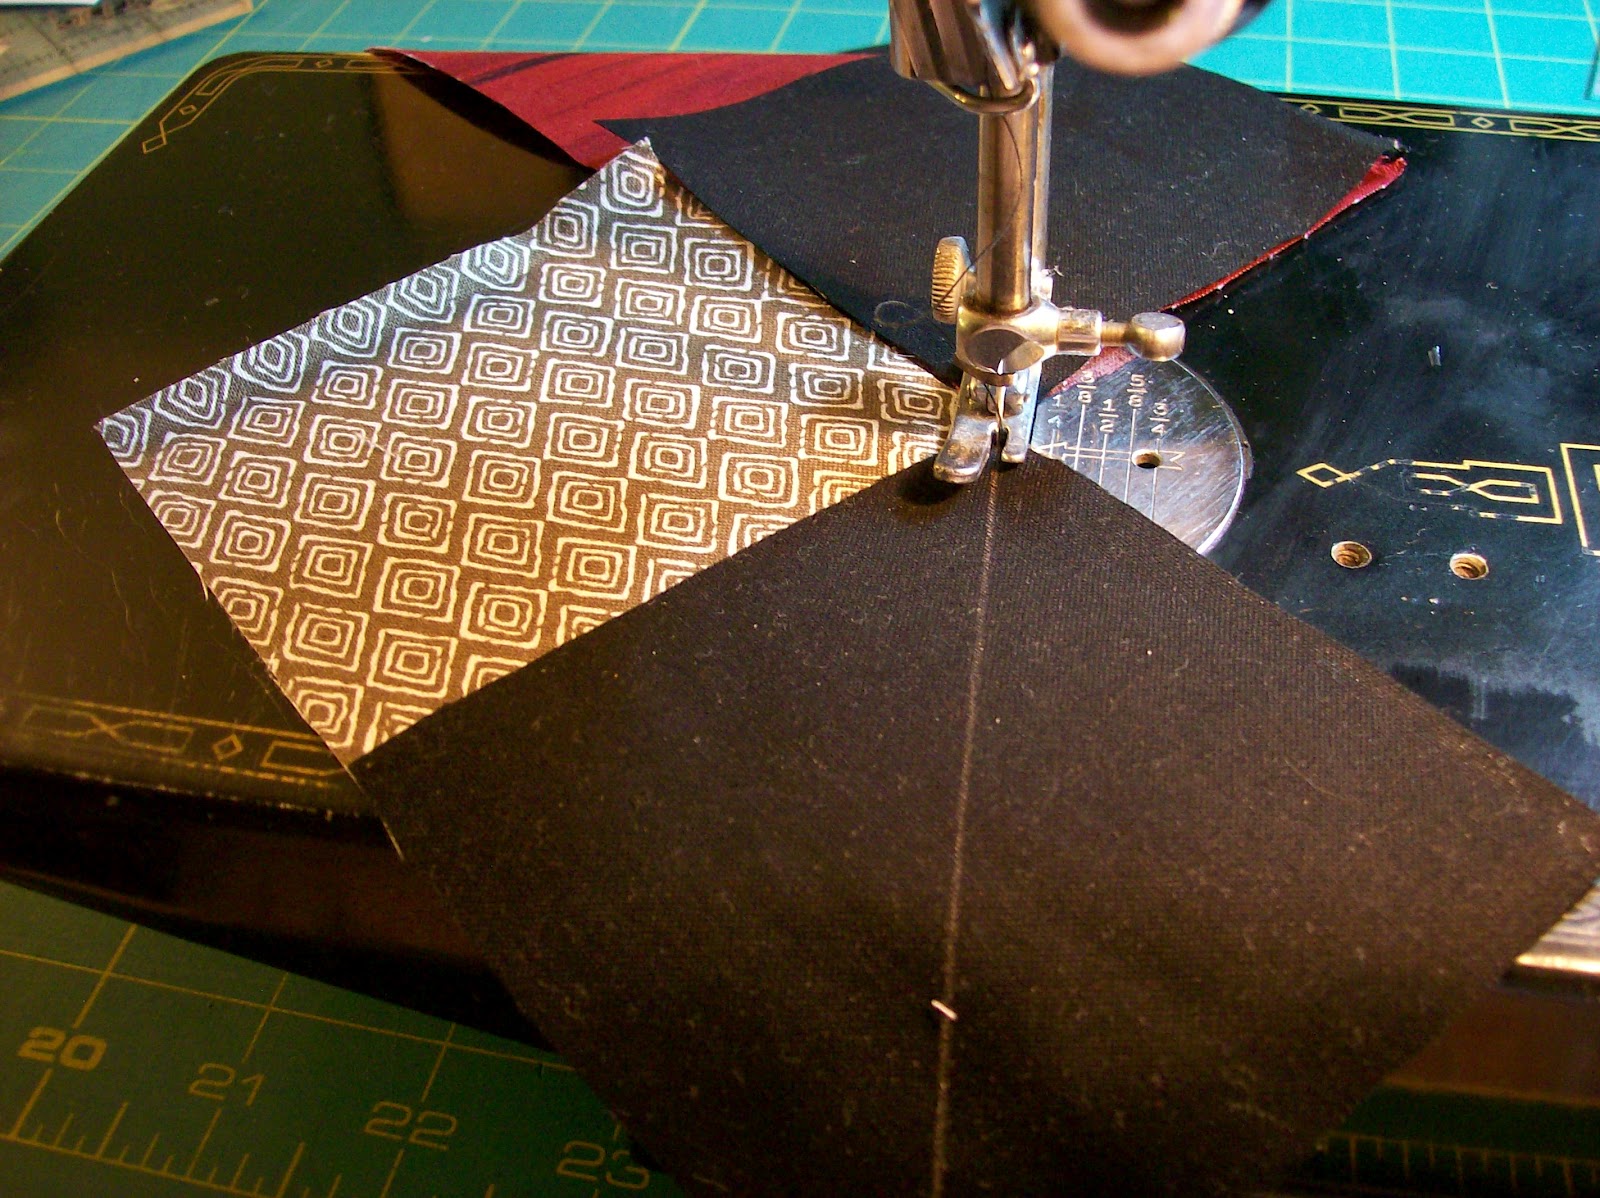
fold your top piece under at an angle (about 45 degrees, but not always.)
The KEY is that the fold on the top  makes the right  "intersections" meet
(hang on, you will understand this in a second!)
Place your bottom piece under the top with angle folded--both right sides are up.
This fabric is directional so check that they are both the same if it applies.
NOTE: I *ALWAYS* make sure the top of the angle fold is on the RIGHT
so that all of my folds go in the same direction.


While holding the two pieces in place, carefully unfold the top piece.
Make sure that both edges of the top/folded piece meet the edges of the bottom piece.
Pin in place (or just hold it if you like to live dangerously, like me.)
Again make sure your edges meet and sew in the fold.
(FYI, I backstitch on both ends to lock seam.)
Trim away your threads and edges at about 1/4"
(this one looks a bit wider, but that's okay.)
Unfold to see your seam--they should meet.
Of it's a milli-fraction off, don't worry about it.
If it happens to be way off, I just cut that seam off and start over
(unsewing with that tiny point remaining intact is impossible) 
Press your seams open, then fold your strips in half long ways.
Press.  You are ready to sew your binding on!
Sometimes, when I am ready to sew, the two fabric strips are clearly not lined up at a right angle (which would form the 45 degree angle.)  Don't worry, it will work anyway, your angle is simply not true (and that doesn't really matter here.)

Monday, April 01, 2013

Spring Showers - Tutorial and Give-aways!

Welcome to the opening day of Soma's Spring Fling Blog Hop!  I am honored to be the first facilitator here on April Fool's Day!  But I am not foolin'!  I have seen some of the designs and you are going to have fun this month.
This little girl is walking in the rain right after a spring shower.  I could not locate a green solid for her boots, so I  simply decided to let her totally 'rock the dots' (like a little girl might dress herself.)

For complete instructions and tutorial for this block, click on the rainbow below, download and print the .PDF:

  • In the .PDF file, on Page 2&3, I've included some changes or "short cuts" you might use to simplify  making the design (just FYI, the design won't be quite as definitive, but works just fine). 
  • Want to try a new paper-piecing method?  This is the one I use with freezer paper.  You can reuse your pattern because it's not torn up!
  • Here are a few tips that might help you as you go:
this tip also works when aligning seams, as well
  • Here's how to make the girlie's braids from embroidery floss.
    1. Select a skein of embroidery floss that is the color you want for ponytail(s) and remove wrappers. Untwist the floss.  
    2. At one end, snip though all threads of the skein. 
    3.  In the middle of the strands, lay the threads out flat. Find the middle and sew across the flattened threads ½” from the center spot. 
    4. Cut the two sections apart between the two sewn spots to make to pieces. 
      • To braid, divide the threads in three even strands of floss. 
      •  Braid them loose at the top (near the seams) and tighter toward the end. 
      • Line up the block's Umbrella Section and Girl Section.  Hold your braids up to the block to decide how long (or short?) they should be. 
      • Put a dot of glue at the spot you will be tying the bow.
      • Tie your ribbon on the end of the braid in your preferred fashion 
      •  Trim the ends of the pony tails. 
      • Position your ponytails in the seam between the finished umbrella and girl block sections.   
      • Carefully pin the fabric and braids in place. 
      • You are ready to sew these two sections together, with the braids sandwiched between them.
I hope you enjoy piecing this little block!  It was fun picking out the "rock the dots" prints for the rain attire.  The cloud background is a little busy and dark.  Next time, I might use a slightly mottled aqua, blue or light gray batik.

The rainbow lets us know that the clouds are parting and the sun is beginning to shine... shine all the way past the May flowers to warmer weather and summer!

If you have ANY problems at all with this design, please email me and I will get back to you as soon as I can.
===========================================================
There are at least TWO GIVE-AWAYS! this month...

PART ONE--MY Give-away: Today, you have three chances to win this prize:

from Jenny at Sublime Stitching
  1. Subscribe to my blog, then leave a comment telling me your favorite thing about spring or paper-piecing (I know some of you have allergies *ah-choo!* and bless you!)
  2. http://www.whimsandfancies.com/category/spring-fling/
  3. Post the Button and a link to the Soma's Spring Fling  Blog Hop on your blog, then leave yourself another comment HERE.
  4. Tweet, tweet tweet about my blog and my block kicking off the Spring Fling Blog Hop. Add a 3rd comment and chance to win!
    TeriEmerson.com
On Monday, April 8, Randy N. Generator will choose a winner for this spectacular kit from Sublime Stitching.

But WAIT ~ That's not all!  Soma's having other drawings (I know this bundle will be offered at the end of the month.
Hello from Alexander, Anna Maria, Tim,
Valori, Rashida, and Denyse... oh, wait, is that
Riley saying hello with .5 yd. B&W Chevrons?
Right above Robert's Charm Square pack.
Russell says hello with chocolate and
an antique sewing machine scissor fob
Pop over to Soma's place to see what's happening there.  You can also see the list of bloggers that will be bringing you free paper-pieced patterns and other goodies throughout the month of April.
HappSewing!
HappSpRiNg!!!

Tuesday, February 05, 2013

Isaiah's Quilt (and FMQ tutorial)

A long time ago, I met a rambunctious, smart and adorable lil red haired boy in my 4 year-old VBS class.  His name is Brandon.  How has enough time passed for him to get married and have a son? (who by the way, looks exactly like his dad!)

I made a little quilt for Isaiah.  First, I found the fabric for the background.  It's a camera print from Robert Kaufman.  Brandon is an ace photographer. I knew the camera fabric had to be for his son's quilt.  I was excited to find all of the other matching fabrics in my stash!
It took me a minute to figure out the pattern, but I laid it out and then sewed 4-patches together.  When the top was pieced, I took it to my friend, Kim, so I could quilt it on her long arm.  Kim she showed me how to do make this puzzle pattern.  The week before, she was demo-ing a Gammill at a quilt show and using this design.  I knew it was perfect for this quilt.

Here's a close up of the teddy I made from the Zakka Style book pattern.

Here's a close up of the puzzle quilting design.

Wanna know how to make the puzzle design?  It's easy when you know the trick!

1. First, decide how large you want to make the 'pieces.'  If you make a puzzle bump on the seams, that gives you an regularly spaced guide.
2. Make all of your vertical lines first.  Note that all of the puzzle 'bumps' are lined up--
this is so you can sew betwteen the straight horizontal lines in the next step. 
It does not matter which direction the bumps go, just alternate from time to time.
(You might want to practice this several times on paper before you try it on your quilt.)

3. Come back with horizontal lines through the vertical puzzle lines and sew the same pattern, 
alternating bumps up and down (use the same regulated markers as you did on the vertical.)

See?  Wasn't that easy?

Saturday, October 13, 2012

5 Point Star Tutorial

This is Week 7 of the Grandmother's Choice Block of the Week quilt along.  The  block is Alice's Flag.
Alice's Flag is a pieced background with
an appliqued star on top of it.
One of the options for the 5-point star is to use a pieced pattern and make all of the points from different fabrics.

I chose to make the pieced star since I am doing a modern, happy interpretation of the quilt.   I took photos to share the method I used to piece and applique the star.

I love to do hand applique and hand embroidery.  However for some reason, I do not like to hand piece blocks.  They look messy to me.  So, I look for machine pieced shortcuts to avoid as much hand-piecing as possible.  Here's how I worked this star.
This is what the .pdf file looks like.
Note the template in the top right corner.

If you click on this link, you will get the .pdf file that has the layout and template for the pieced 5-point star. (the basic cutting and piecing instructions are on the blog.

1.  Cut one point from each of the five different fabrics you have selected.
I marked the beginning and end of the seam lines
with a dot of temporary marking pens.
 To accurately mark the dots, poke a hole in the template on all for points.  Then hold the marker over the whole for a few seconds until the ink leaks through the pinhole and accurately marks the spot with a dot.
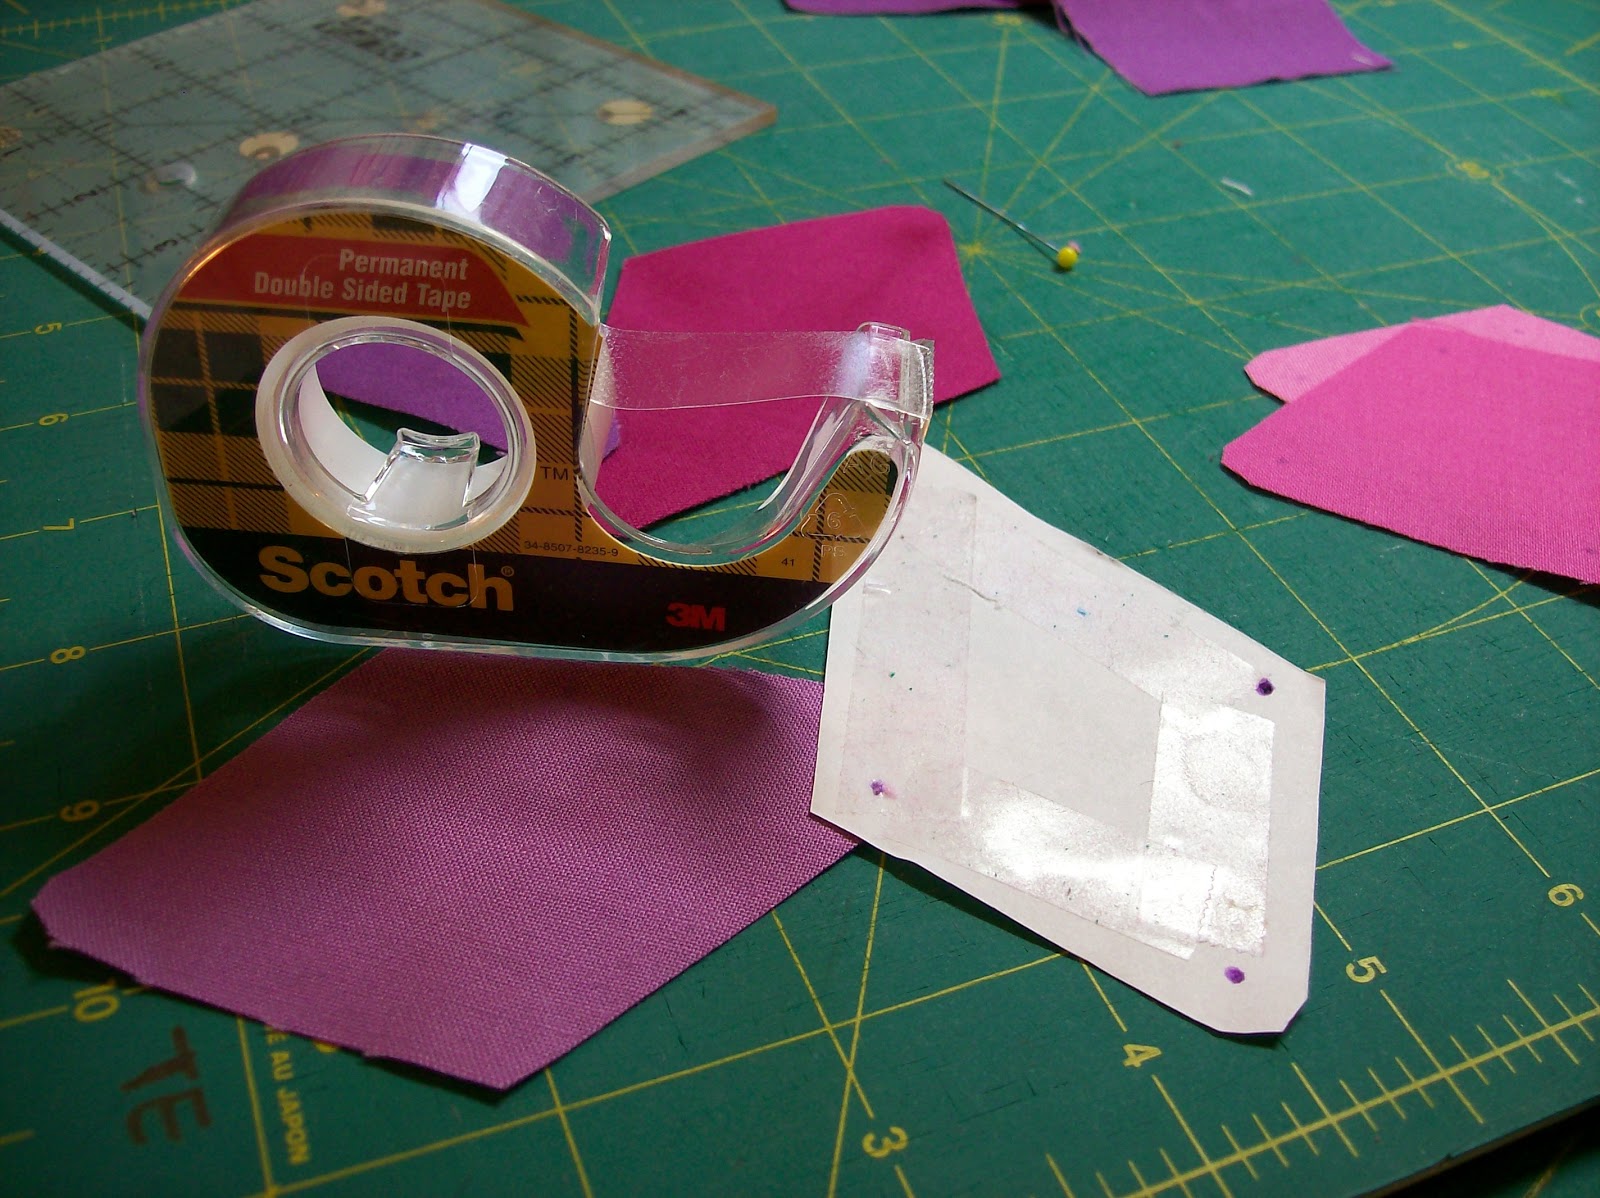
BTW, I used two-sided tape to place the templates on the fabric,
then cut each one with a rotary cutter and ruler.
Take care to remove it gently so your bias cuts don't ravel.  
2. Using extremely large stitches, baste around the points
that will NOT be sewn together.  This will give you a line to turn under when you applique.
You can pick out the stitches as you applique it down.
Note: when you baste the edges, they will tend to curl under.  Gently pull on the thread, NOT the fabric, to straighten the edges.  Take care not so stretch those edges that are cut on the bias.
3. Prepare to sew the points together.
Line up the dots using a straight pen
to insure accurate seams
Sew two of the points that are side by side together
(you will have two pair)
*BE SURE TO SEW ALL THE PIECES IN THE ORDER THEY ARE LAID OUT.  It would behoove you to check placement twice before stitching!
4. Join the last single point to the pair that is beside of it.
To avoid accidentally stitching it,
pin the previous seam open and away.
NOTE: when you pin your edges, only sew ONE side of the pair (or you will feel silly and end up picking out one side, like I did. *sniggers and blushes*
5. Sew the pair of points that are already joined to
the other three points to complete the center of the star.
This is what the front will look like at this point
6. Turn the block back over the back to press the seams.
Press each seam in the same direction.
7.  Because there is a 1/4" opening at the end of each seams,
you can use your finger to manipulate the center intersection of seams until they twirl,
this is also clockwise.  Then you can press them flat.
8. Press the points in just past the basting seam.  
Then press one side of each point.  
Do not press the other side so you can turn it while sewing.
This will help make your points as pointy as possible.
9. Position your star on the background fabric.  
You can baste it down or you can carefully pin each section.
Take care that each piece is lying flat 
so you don't have lumps in your finished applique.
10. Continue to blind stitch all the way around the star.  
Voila!  You are finished!

If you find a step that you can't understand the wording or does not work for you, please leave me a comment and we'll try to work it out together. :)

Tuesday, October 02, 2012

Paper-Pieced Pirate

It's Day 2 of the Something Wicked This Way Comes blog hopping paper-piecing spooky fun.  ARRR, matey!! I've got a scary pirate for you to sew.

I'd like to thank Soma and Ruthie for letting me know about this blog hop.  It's my first time hosting a hop and my first time publishing a paper-pieced pattern.  If something doesn't work or if you have questions, please be gentle. ;)  Leave me a message and I will get back to you as soon as I can!

If you are new to paper-piecing, you can try the method in my tutorial below or try this one Ruthie's post.  Let's get started!


SKILL LEVEL: Beginner with some experience This pattern makes a 10 ½ inch block that finishes at 10 inches. If you tend to sew blocks a little smaller or larger than it should be, this pattern makes allowance for that.

You will need: 
- FQ of fabric for the background
- FQ ash gray for the skull
- 10”x10” scrap for the bandana
- Light colored scraps for the teeth
- Black scraps for the eye patch, eye, nose and tooth
- Dark scrap for cutlass handle
- 10”x3” gray scrap for cutlass blade

1- Print off the .PDF pattern with your templates: Follow my method or any paper-piecing method should work!

2- Cut the template sections apart: There are different sections which are labeled alphabetically, A-G. Cut these seven sections apart.

3- Begin by piecing the pirate’s cutlass (sword): This is a good place to start because it will go fairly quickly! In Section G, start with the gray fabric for the cutlass. Add pieces by number, starting with #1. Repeat process for Section F. When complete, this section should measure 3”x10 ½ “. Lay this section aside for now.

 4- Piecing the pirate’s head: Begin with the top of his head which is Section A. Sew the pieces in order as numbered. The tiny A9 strip is last because it is so thin. When Section A is complete, set it aside and move on to Section B. Piece sections B-E just as you did Section A.

NOTE: when you come to section E, I have all of the teeth labeled E1. See picture with instructions below for an easy way to piece all of those teeth!

5- Finishing the Pirate: Sew section A to B and C to D. Then sew AB to CD. Press seams to flatten the fabric—take care not to stretch the fabric or stitches.

6- Adding the pieces on the sides of the head: Measure the size of the pirates head. It should be 6 inches. Don’t fret if it is not. The pattern can be adjusted. Simply continue on from here.

7- Cut two pieces of background fabric: one for each side of pirate’s head. Each one should be 4 inches wide and the height of the pirate’s head (6 inches or what you have measured). Sew them on to both sides now.

8- Square up the sides: Use your rotary cutter and ruler to square the sides up to be 10 ½ inches. DO NOT cut top or bottom of the center section at this time.

9- Sew the skull and cutlass together. 

10- Add the final top piece: Measure the sewn piece from top to bottom. It should 8 inches. If your measurement is different, simply add or subtract a little more fabric to compensate. To the 8 inch block, sew a strip that is 3 ½ inches wide.

11- Square the block. Use your ruler to square the block so it measure 10 ½”x10 ½”

Shiver me timbers, yer done!


EXTRAS: Follow the diagram so you can set the teeth in as though they are one unit

To make the 3-D knot on his kerchief, Cut a strip of red fabric 6”x2”. Fold sides, then the ends as in the diagram. Stitch edges up. Tie the strip in a knot and stitch to the side of his kerchief.

 If you want, you can stitch or write a piratey saying in his cutlass. I embroidered “ARRR!!”

 If you really want to get fancy, you could tack on a gold earring (made of wire), or maybe fuzzy or felt mustache.

That was fun!  Thanks for stopping by!  When you finish your block, you can post pictures of your pirate at this Flickr group! 

This blog hop was sponsored by Soma of Whims and Fancies.  Thanks Soma, for letting me join in!  Thanks Ruthie, for telling Soma about me.

Want to make more?  Ruthie's bat was yesterday and Gaya is tomorrow.

All info and graphics are property of Handiwerx, for personal use only.  

Monday, October 01, 2012

*NEW* Freezer Paper Piecing Method - A Tutorial

A "Whole Paper" Method
Sorry about that window in the last blog.  It's a Google utility that works... sometimes.  Here's the info without the toy. :)

I have googled and searched but haven’t found anyone else using a similar method of paper-piecing. For me, it works better than anything else I have tried. Quilt designer, Amy Buehler taught a class that I attended where she taught her method of freezer paper-piecing.

Foundation and freezer paper-piecing (where you cut the pieces apart) are combined here. You cut apart some sections, but not as much as cutting individual pattern pieces of freezer paper (FP).

BENEFITS: You don’t have to pick bits of paper from the back of your piece. - Because you don’t actually sew on the FP, your pattern is reusable for 4-6 times. If piecing many blocks of the same kind, reusing the pattern saves FP and a considerable amount of time.

METHOD: 
     Copying Your Design
              Make an identical copy of your design using one of these two methods:
  1. Inkjet Printer Method (no laser printers allowed as this will ruin it!) - Using an old rotary cutter blade and ruler, cut the freezer paper to 8.5”x11.” - Print directly on to the paper side of the FP (shiny side should be down.) - To reduce printer jams, flatten the FP
  2. “Needle Stitching”: If you don’t have an inkjet printer, use this method (explained on Page 4.) 
     Piecing Your Pattern
              TIPS: When ironing paper to fabric, always place the fabric and the freezer paper “Back-to-Back.”              
                        When sewing fabric, always place right sides together or “Front-to-Front.” 
                         Never sew on the paper. Instead, stitch closely to the folded paper line.
Set your iron on high heat. Iron the back/ shiny side of PIECE1(to back/wrong side of fabric to FP. Hold pattern and fabric up to the light if you are unsure that you have the pattern covered with fabric. Be sure to cover piece by 1/2 inch all the way around!
Fold back to the piecing line between Piece#1 and # 2.
Make sure each piece fabric has ¼ inch seam allowance (trim if needed.)
Place fabric for PIECE2 facing PIECE1 (Face-to-Face) Sew right up against the line—DO NOT sew on FP! Sew ¼” past each end of the line (it’s okay to sew further.)

- Gently remove FP from the back of all finished design sections. 
 - Take care not to pull away quickly as this may cause the edges to fray. Repeat this method until all pieces are together. 
 - Repeat for all pieces until you’re finished! If you have questions, please leave a comment and I will get back to you.

"Needle Stitching"
Using standard copy paper, print your design. Pin or tape paper design to matching size FP.
     TIP: If you have many blocks to sew from one design, you can make three copies at once.
            Use the point of your iron--set to medium high--to spot iron 3 sheets of FP together.
            Then you can sew through all three!

 - Remove the bobbin and top thread from your sewing machine.
   Put in an old, dull needle for piecing the paper - Set your stitches as long as possible.
- Carefully stitch on all of the lines of your design.
- Hold the perforated design up to light to make sure all lines are stitched.
- Transfer your numbers with pencil or indelible ink (not ink pen!) DON’T FORGET to put a good needle back in your machine!

DOWNLOAD .PDF OF THIS PAGE

Saturday, May 05, 2012

Ladybug Paper-pieced Pattern


About a week ago, I added paper-pieced ladybugs to an Add-a-Border round robin block.  Several people have asked to know how I made the ladybugs.  Here you go.


Ladybug... Ladybird 

If you have ever pieced a Snowball quilt block, this pattern may seem familiar to you. The ladybug is small enough that you can make it with scraps. Polka dot fabrics look nice on the body. 

The pattern is basically symmetrical so it works for all kinds of paper-piecing without reversing. You can enlarge the pattern to make the bug any size you want.
  1. There are 3 sections of this pattern: H=head, B=body, and A=background
  2. Note the only colored areas are ladybug body, and black on the middle stripe and head. Everything else is background color.
  3. Start piecing with B1, which is the black stripe in the middle of the ladybug’s back. Move to B2 and B3, then B4 through B7.
  4. Piece H1 though H5, in order.
  5. Sew the body and head together.
  6. Finish by sewing the “A” pieces of the background in numeric order.
  7. Embellish the legs and antenna with embroidery or draw them in with a Micron marker.

Sunday, April 01, 2012

Hounds Tooth Style Pinwheel

Quilt Block Tutorial
I made this block for the NuBees block swap and two people have asked how to I made it.  I just made up the pattern. Therefore, I give you a tutorial.


You could make this block using all HST's, but I think this method is a little less trouble.
1. I used 4 colors, all with the same background.
2. For each block, cut:
       (4) 3.5" background squares (16 total)
       (2) 6.5" x 3.5" of 4 different colors (8 total)
3. Draw a diagonal line corner-to-corner on the back of all of the background squares.  This is your sewing line.
4. Chain sew all of the squares to a rectangle on the right; press' chain sew all of the squares on the left side of the rectangle.
FYI, the construction method is just like sewing flying geese, but you sew the diagonal on opposing corners, not side by side.
IMPORTANT: Take care to sew all of your rectangles with the same corners! (otherwise--like when you are making pinwheels--you will have same colors together instead of your desired pattern.
5. With your rotary cutter and ruler, trim the excess triangles from rectangle corners to 1/4" and press (I pressed open.)
6. Sew the four matching pairs together.
NOTE: For matching seams/points, when you are lining up your pairs of rectangles to sew together, take a pin and stick through the spot where the two pieces have seams. Use the pin to line them up perfectly. Add a second pin to hold the two together and remove the first pin.
7. Lay out the for square patches, turning each a qarter-turn.
8. Sew two squares together, then sew the two sets together.  All done!
four variations of this design